


Photoshop is always a better option for making graphics and effects. Here are the steps to get crayon effects in Photoshop
1. Create a new blank document of the required size, e.g. 1000 px X 1000 px
2. Select the Brush tool from the toolbar and in the tool options at the top of the screen, find the spatter brush, size 24 pixels in the drop down menu.
If you want a thinner crayon you can pick a smaller diameter brush.

3.Open Brushes palette by choosing Window > Brushes.
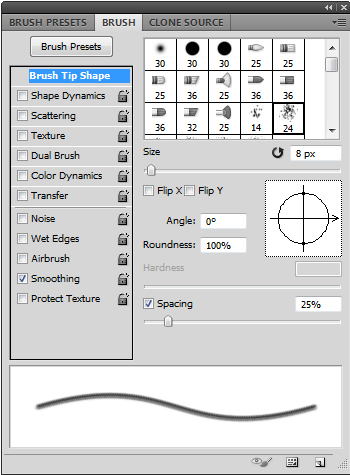
Brushes window will appear on your screen, click on “Brush Tip Shape” under Brush Presets thats is on the left hand side of the brushes window.
Make sure the value of spacing is 25% which is a slider at right bottom, you can see the preview area and confirm yourself.
4. Now click on “Shape Dynamics” option and set the Size Jitter to 20%, Angle Jitter to 100%, Roundness Jitter to 50% and Minimum Roundness to 25%.

5. Now click on “Color Dynamics” and set the Saturation Jitter to 50% and Brightness Jitter to 15%.

Now you have a crayon effect brush in your hands. It is as good as real crayon. You can vary the size of the brush by clicking on the Brush Tip Shape and changing the diameter there.
You can also save this brush by clicking on the Create New Brush Button at the bottom of the Brushes palette.

Following image is made by using the crayon brush effect, you can use different colors and come up with much better kind of stuff than this.

Share Your Solutions
No comments:
Post a Comment